
Gameplay
Gameplay
BackBattles
Basics
Rally point - attack limit
The Rally point is the central meeting point of your troops and the place where you coordinate them. Your village has a limited amount of simultaneous attacks that can be sent out from it. Support commands aren't affected by the limit.If the commands reach the limit of the 50, you have to wait until an army returns.
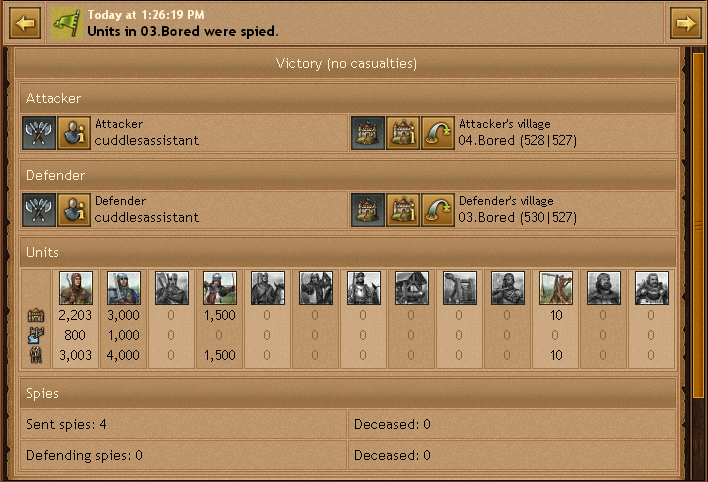
You can see the result of a battle from the battle report that is generated after the fight.
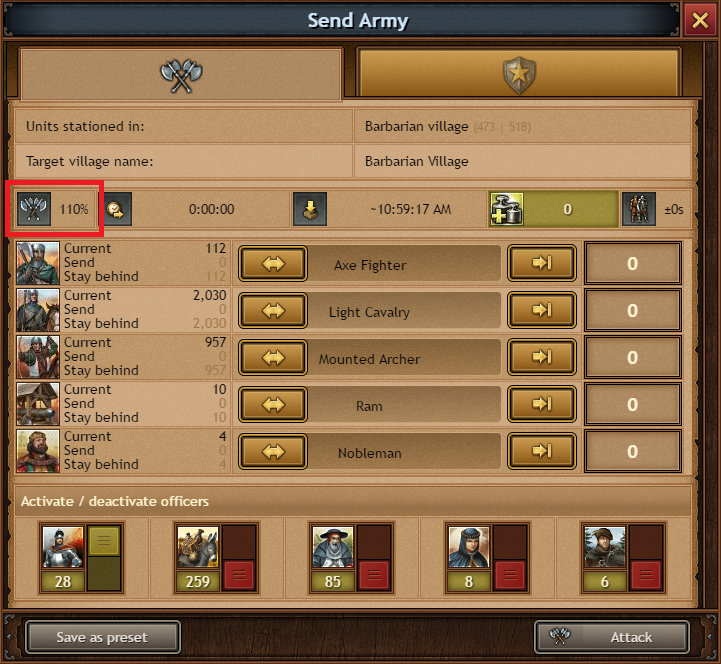
Send custom army
Once you've built a few units and want to attack an opponent, just go to the map and click on the village that you want to attack. There you can select "Send army". Choose the "attack" tab, then choose the units you want to send, and click on "attack". It's important that you don't forget that every village has a base defense and that the opponent might have units as well. All units have different strengths and weaknesses, which makes some units better for attacking and others better for defending. You can find details about the units' skills in the Units overview.Relocate Units (Only active on specific worlds
On newer worlds you will see the attack has three tabs, like the screenshot below shows. The third tab is for the feature "Relocate Units".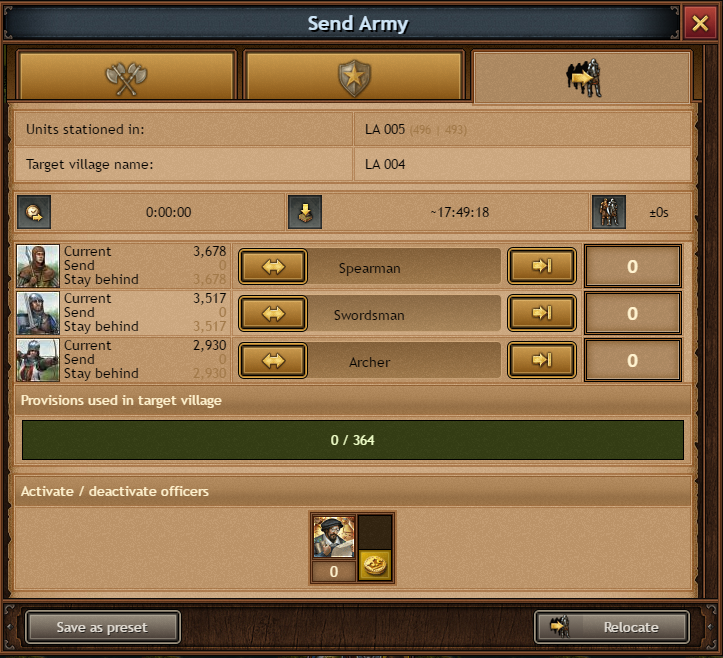
Choosing the third tab gives you the opportunity to relocate units from one village to another. The units will then travel to the new village, where they will set up there new command post. You will then be able to command them from the new village.
This can be a strategic advantage, as you can relocate units from your secure zones and up to your front line villages. This feature comes with some restrictions:
- You can only relocate to your own villages
- The loyalty of the village must be 100
- You can only relocate as many units, as the new village can hold
- The tribe skill "Unity" does not apply to relocating units - but the tactician will double their relocation speed
- It will take 6 hours to relocate your paladin, regardless of which other troops are being relocated
- You can cancel a relocation order, when the origin village is below 100 loyalty.
Presets
Getting tired of setting the exact number of units manually every time you attack? Time to use [[Presets|Presets]]. Open the Rally point window and create a new preset. You can customize its name, icon and the units that are included.Once you have created a preset, you can use it in all your villages. Just open the global list there and enable the preset you want. Presets can be used for attack and support operations as well as for recruiting. In case of recruiting, the exact number of units to fill a preset is recruited. Of course your village has to provide the necessary resources.
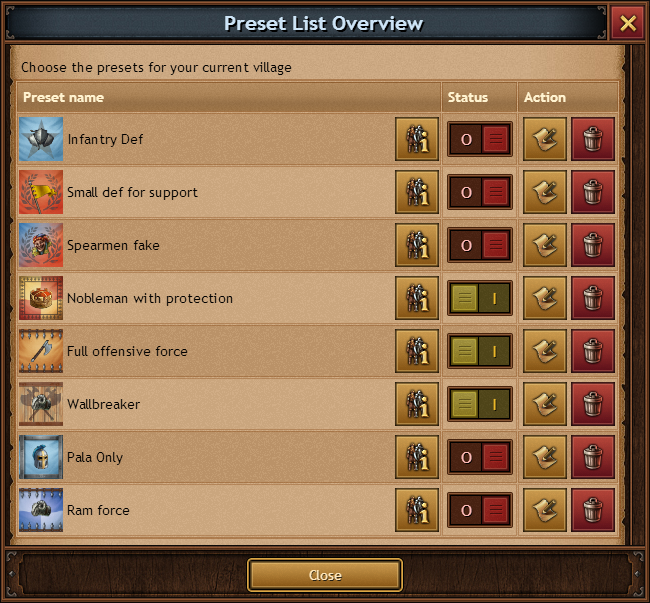
Using presets is easy, but you have to understand what the small details tell you.

| Number | Name | Description |
|---|---|---|
| 1 | Preset icon | This is the icon you created for the preset. If the army is moving on the map, you can identify the army by that icon. |
| 2 | Preset name | This is the name of the preset. |
| 3 | The Generals | The Generals you have chosen to assist your army. In this example all generals are enabled. Remember: You can set presets even if you don't have enough generals available. Then the general's ability just isn't available. Generals are only consumed if their ability is triggered. |
| 4 | Preset armies | This number tells you how many of these presets at full strength are available. In this example the preset consists of 100 Spearmen and in your village 3908 of them are stationed. So you could send out this preset 39 times. |
| 5 | Non-finished preset | This progress bar shows you the current state of the non-finished preset, in this example the 40th. You can see that there are already 8 unused Spearmen in your village and you have to recruit the other 92 to fill up that preset. |
| 6 | Remove preset | With this button you can disable the preset in the current village. This doesn't affect the preset itself if you use it in other villages. |
| 7 | Automatic recruit | This is the automatic recruit button for presets. Remember the example? If you click it, and you have enough resources available, 92 Spearman would be recruited in the Barracks. Clicking it again will put another full preset in the recruiting queue. That would be 100 Spearmen in this example. |
Tip:
For easier communication within a tribe it is recommended that all tribe members have the same presets with reasonable names and exact same number of units.
Defending
If you are getting attacked regularly, the aggressor probably either wants your resources or to noble your village. If there is no Nobleman included in the attack, the attacker is probably just trying to plunder your resources. There are a few things you can do to protect yourself:- Contact your tribe for help
- Keep the stored resources low by using the available resources right away
- Research protective technologies in your Warehouse
All units have different abilities, which make some units better for attacking and others better for defending. You can look up details about the units' skills in the unit overview.
In the beginning the Paladin is a very good unit to protect yourself against the first attacks and it becomes even more valuable when other players send their Paladins as support.
Don't forget to build the Hospital. If you lose units while defending your village, some of them will be healed in that building and can be used again later. Units in the Hospital do not participate in a battle.
Supporting
Sometimes another member of your tribe or a friend needs your help. You can send resources to other players, but you can also send troops as support to help them defend against enemies. To do this, click on your tribe member's village and select "Send custom army" and choose the "support" tab. Add the units you want to send and then click on "Support".At a Level 2 Statue you can research the "Forced march". When you send your Paladin as part of your supporting army, all your troops move at the same speed as the Paladin. You can also send a tactician general instead of the Paladin, which has the same effect.
When your supporting troops are attacked in another player's village you will receive a report telling you how many troops you have lost. You do not see who attacked, or how many units were attacking. When your troops are done defending a village you can withdraw them. To withdraw your troops open the unit window. There you can withdraw some or all of your troops.
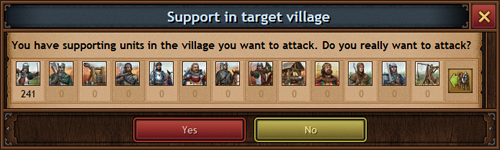
You get an warning when you are about to attack your own troops (as they might be supporting a village you don't remember). This warning will tell you how many troops you have supporting the village, and the option to bring them back.
Speed and Discipline
You can see the speed of the units in the unit overview. When you send several units together, they will march at the speed of the slowest unit. The marching speed for returning armies can be different if the slowest units died during a battle.An exception to this is the Paladin when you have researched Forced march in the Statue. When you send out support troops that include your Paladin, all troops that march with him will move at his speed.
Your troops always march as the bird flies, meaning they move diagonal over villages, rivers and mountains without a change to their speed.
When your armies are getting larger and more unit types like Cavalry and Siege weapons are mixed in, the discipline of the army is reduced. That means there will be a deviation on the arrival time of a few seconds.
You can increase the discipline again by researching technologies in the Barracks.
The Wall
The Wall greatly increases the defense of the village. It affects both the base defense and the defending troops.The Wall is very effective to protect yourself from plunderers, especially in the early stages of the game. Later in the game a fully constructed wall is the backbone of every defensive army.
Base defence
Every village has a base defense. This means that every village defends itself, even if no troops are stationed in the village at the moment of the attack. The idea is that very small attack forces, like 1 or 2 Spearmen, will die even without defending troops. The base defense is increased by upgrading the wall.Defence Bonus
The defense bonus applies to all units that are defending your village, including supporting units. At level 20, the Wall provides a 100% bonus (meaning the defending units fight with double strength).Provinces and Churches
The Church is the religious gathering place for your villages within a province. Without a Church the troops in the province fight with only half their usual strength. Each of your villages should be in a province where you have at least one Church.If you send support troops to a friend, the faith of his or her village applies to your troops, as they now fight under another command.
You begin with a Chapel in your first village. This Chapel is a special kind of church. Each player may only have one Chapel and it is already built in your first village when the game starts. It has the same influence as a Church at level 1. The Chapel can not be destroyed with catapults.
If you lose the village with the first church, you can rebuild the Chapel in any other village. You are able to build the Chapel in any village for a much lower price than other churches as long as you don't already have a church in the villages.
Tip:
In the early game you should focus on villages within your province. Attacking other players outside of your province will result in a 50% lower combat strength. While this is a great advantage for your defense when you are attacked by bigger players from other provinces, it is on the other hand harder for you to conquer a village in another province and defend it. It is important to quickly build a Church there, so that your troops in that province have faith.
Other Church facts:
- The Church needs a lot of farm space so it is not wise to build a Church in every village. The higher the building level, the higher the combat strength in the province.
- The Church is destroyed when a village is taken over.
- The Church has more hitpoints than any other building. So it is well protected against catapults.
Tip:
In the late-game it can happen that a single player or tribe owns all villages within a province. In this case, try to destroy all enemy churches first, before you start conquering.
Espionage
With spies you can get access to important information about your enemies' villages. To spy on a village you need a Tavern and at least one spy. Then send one or more of them on a reconnaissance mission. There are 3 different options available:- Scout buildings: Your spies try to find out what building levels the selected village has.
- Scout units: Your spies try to find out the number of units that are currently stationed in the village. There is even a small chance to find out how many enemy units are currently stationed elsewhere or are on a mission.
- Sabotage: Only available if you have chosen the "Thieves Guild" reside in your Hall of Orders. Your spies try to damage a random building in the target village. They can however only lower the building by one level with a successful sabotage. The Chapel and the hospital cannot be damaged.
Please note that for a sabotage mission you have to send a minimum of 3 spies and at least 3 spies will die, regardless of the missions outcome (successful/unsuccessful).
Spies travels with different speed depending on their mission; for sabotage missions they will walk 4 times slower, compared to a espionage mission.
Tip:
Sabotage is an efficient way to demolish well-defended villages, as you can bring down the Farm, Church or Wall without using your armies. Of course you need a lot of villages with the Thieves Guild.
If you have upgraded the tavern to level 14 or researched the technology homeguard with crowns, you mobilize your citizens to protect your village against sabotages. Sabotage attacks will fail more often compared to a village without this research.
The enemy will not notice your spies as long as they are on their way. There is even a chance that the enemy will not discover your spies at all.
The only way to defend against spies that are attacking your village is to have spies in your village yourself. They can uncover and defeat the arriving enemy spies.
If you successfully spy units or villages (green dot at the Report) then the most current report is shared with your tribe: every tribe member can find the link to this report on the village info window.
But be aware: Some of your spies might die while defending against an enemy espionage. You will not always get a rapport of such incident. Be sure to check your spies regularly to see, if they are still in place!
You can also use countermeasures to deceive enemy spies. These are more likely to happen than a complete wipe of the enemy spies. To make the countermeasures work, you need at least one spy in your village. There are 4 different kinds of countermeasures:
- Camouflage: You can set a fake building level that the enemy spies will report to their Lord. For example, you can make your Church look to be level 0.
- Switch Weapons: Choose two unit types that will switch their weapons. You can hide your Noblemen with that trick.
- Dummies: Set up dummy units to feign a much bigger army.
- Exchange: This countermeasure forces a Spy, who failed to scout your village to submit a spy report of his or her own village instead.
Note: For counter measures to work, you need at least one spy in your village. Counter measures only have a slight chance of being activated when spied.
Sample spy report for units
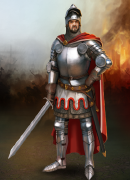
Paladin
The Paladin protects your villages and can also lead your units into battle. Each player may only have one. The Paladin can be equipped with [[Paladin#Weapons|weapons]] that give your army bonuses.Advanced
Battle modifiers
Strength is not the only factor that determines a battles outcome. In addition, other factors can turn the battle around. These factors apply to both the attacker and defender.Example of attack modifier calculation, all values are calculated in percentages:
Attack modifier = 100 * ((faith/100) * (morale/100) * (100 + luck)/100) + officer value (10 if Grandmaster, 0 if not) + tribe attack bonus (0 if skill not used, max. 10 for skill at lvl5)
You can see the total attack modifier in the battle report. If you hover over it with your mouse, you will get the values displayed in percentage. In this example the calculation would be:
100 * (1 * 0.5* 1.04) + 10 + 10 = 72

The lowest possible attack modifier is 11% and the maximum modifier is 147%.
Example of the defense modifier calculation, all values are calculated in percentages:
Defense modifier = 100 * (faith/100) * (100 + (5 * level of the wall) / 100) * ((100 + night bonus)/100)
The lowest possible defense modifier is 50% and the maximum modifier is 440%.
Let us have a closer look at the factors:
Faith
The faith depends on the existence of a church or a chapel in the province. For more information, see Chapel/Church.Supporting units have the faith of the village they support, independent of the faith of their home village.
Morale
Morale is a protection for new players. It is calculated by the points of the attacker and the defender. A player usually attacks with 100% morale, but if you attack a player who is much smaller than you are, you will be penalized. For example, when your opponent's morale is 45%, your troops will only attack at 45% of their usual attack strength. If a smaller player attacks a much bigger player, there is no bonus on the attack. The maximum morale is 100%.Time can also be a factor in morale calculation, in that it uses the time since the player joined the world. If a small player has been playing on a world for a long time but still has a small amount of points, morale will continuously rise until it reaches 50%.
The morale influences the combat strength that you can see in the attack window.
Luck
Luck is a completely random element of every fight. Your luck will be somewhere between -15% and +15% and it is always given from the attackers point of view. If you are attacking with +15% luck, it means that your fighting power is increased by 15%.For the calculation of the modifier, you add (luck) or subtract (misfortune) the given value to 100% to get the value to apply.
Bashpoints
You get bashpoints after every battle. The bash-points shows you how successful you have been as attacker (offensive bashpoints) or as defender (defensive bashpoints).The number of bashpoints gained from killing a unit depends on you being an attacker or defender. Either you are an attacker or defender, you get 1 bashpoint for every unit you kill whilst attacking/defending respectively.
See the table for more information.
| Unit | Defensive bashpoints | Offensive bashpoints |
|---|---|---|
| Spearman | 4 | 1 |
| Swordsman | 5 | 2 |
| Axe Fighter | 1 | 4 |
| Archer | 2 | 5 |
| Light Cavalry | 5 | 13 |
| Mounted Archer | 6 | 12 |
| Heavy Cavalry | 23 | 15 |
| Ram | 12 | 10 |
| Catapult | 12 | 10 |
| Paladin | 40 | 20 |
| Nobleman | 200 | 200 |
| Berserker | 10 | 25 |
| Trebuchet | 25 | 0 |
You can compare your bash-points with those from other players in the [[Interface#Ranking|rankings]]. In the rankings there are columns for offensive, defensive and the sum of bash-points.
Grandmaster
If you send a Grandmaster with your army, it will attack with 10% more attack strength. Therefore, a factor of 1.1 will be used for the battle modifier. If you don't send a Grandmaster, the value is 1.0.Night Bonus
During night, the defending units get a bonus to allow players to sleep better. When an attack arrives during the night bonus, the defender gets an additional 100% bonus,, which means that the normal defending strength is doubled. During the rest of the day, this factor is 1. If the player has a church at level 3 in the province and a wall at level 20, the defending units fight with 440% strength at night.Catapults and Rams
Catapults can destroy your opponent's buildings. If you initiate an attack with catapults, you can select which building shall be targeted in the window from which you launch the attack.Note that buildings have different hitpoints. Also technologies to increase hitpoints can be researched. Academy, Preceptory and Church have way more hitpoints than other buildings.
The following buildings cannot be demolished below level 1: Headquarters, Farm, Warehouse, |Chapel. The hospital can not be targeted by the catapults.
The Ram is used for tearing down the enemy Wall. This is done twice during a battle. The first ram attack will be executed before the battle starts and lowers the defense bonus of the defender if successful. The second attack is done after the battle with the surviving rams.
If your tribe uses the Tribe Skill Iron Wall then the Wall cannot be demolished under a level corresponding to the level of this skill.
Officers
Officers can bring great benefit and tactical finesse to your strategy. If you have Officers in your service, you can assign them to armies. Officers can be purchased in the shop or gained as rewards from quests and resource deposits.If you have assigned Officers to a preset, they will automatically join the preset army if available. If there were not enough Officers available, the army will begin marching nevertheless, but without the Officer.
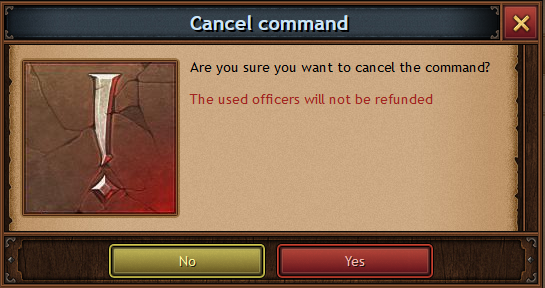
Please note: A pop up confirmation window will be shown when you are about to cancel a command that uses officers, informing you that the officers will be lost if you continue the cancellation.
| Icon | Name | Description | Ability |
|---|---|---|---|
 |
Grandmaster | The Grandmaster is the perfect leader for your armies. With his experience and presence he is able to raise the fighting strength of the army he accompanies and increases your chance of victory. | Increases the attack power of an attacking army by 10%. |
 |
Master of Loot | The Loot Master and his faithful mules aid the victorious army they travel with by carrying the spoils of war to your village. | Increases the carrying capacity of an attacking army by 50%. He also has a chance to upgrade the resource buildings in a Barbarian village. |
 |
Medic | The Medic follows your attacking armies in hope of saving a few fortunate souls. After a battle, the medic combs through the battlefield in search of soldiers with minor injuries, who then receive medical attention and replenish your army's strength. | Reduces the number of casualties of an attacking army by 10%. |
 |
Deceiver | The Deceiver is a cunning and illusive general, who misinforms the enemy about the movements of your Noblemen. The enemy will perceive your attacks as if a Nobleman was riding amongst them. | Slows the travel speed of the entire army down to that of a Nobleman's. |
 |
Ranger | Camouflaged by the shade of the trees or the cloak of night, the Ranger escorts an attacking army and scouts the enemy's military strength. An attack will only be carried out if the odds are in the attacker's favor. | The attacking army only engages in battle if they would be victorious, otherwise they return home. |
 |
Tactician | Armed with knowledge and wisdom rather than with sword and shield, the Tactician studies the terrain and geography of the land and guides supporting armies swiftly to their destination. | Raises the speed of a supporting army to light cavalry speed. This doesn't stack with Paladin technology Forced March. |
Barbarian villages
You can easily identify abandoned villages as they are named Barbarian villages. There is no difference between villages owned by players and abandoned and Barbarian villages. The moral for empty villages is always 100%. You can take over empty villages just like any other. Although Barbarian villages have no owner, they will grow to a certain size.When a player deletes his or her account, their villages will eventually turn into Barbarian villages. Sometimes units are garrisoned in Barbarian villages that formerly belonged to a player.
Conquering villages
Taking over another village
Nobling means taking over another village. To noble a village, you first need a Nobleman and attack the target with it. During a successful attack the Nobleman reduces the village's loyalty. The base loyalty of a village is 100 and every attack lowers the loyalty by 20-35, even if you send more than one Nobleman in that attack. To take over the village, the loyalty needs to be lowered to a number below 0. This usually takes 4 or 5 attacks, in rare cases it can also be done in 3 attacks.A Nobleman attacking alone usually dies on the base defense of a village, so you should always send troops with him.
As soon as the Nobleman has reduced the loyalty below -1, he takes control over the village as the new ruler in your service. He cannot be used for another attack any longer. The units which accompanied the noble stay at the new village as support.
Recruiting Noblemen
To create a Nobleman, you first have to build an Academy. To be able to do this your Headquarters must be at least level 20. You also need enough resources and farm space.How many Noblemen you can hire depends on the amount of gold coins you own. You can store these in your Academy. Gold coins are not used up or lost, even if you lose a Nobleman or a village. They are stored globally and do not have to be transferred to other villages.
The more villages you conquer, the more coins you need for a new Nobleman.
Tip:
In the later game, it is useful to have the "Thieves Guild" in villages that are minting gold coins, as that Guild reduces the cost for a coin.
Loyalty
The loyalty of a village shows how close the village is to change ownership. It is usually at 100, in which case it isn't shown. But as soon as it is attacked with a Nobleman, the loyalty is decreased by 20-35 with every attack. The loyalty usually rises by 1 point per hour, but this is dependent on the speed of the world. For example, on a speed 2 world the loyalty will rise by 2 points per hour.As soon as the loyalty falls below 0, the village is seized by the attacker and loyalty is increased to 25.
So you have to reduce the loyalty below 0, you will be unable to conquer the village with 0% loyalty. But you get a pretty award for it.
Being conquered by another player
Losing your village is of course an annoying setback, but it is no reason to quit. You move into a new village on the outskirts of the map where you are in close vicinity to other players with new villages. You will therefore have a good chance to grow on this side of the world.Ask your tribe for help and let them send you resources or support troops so that you can rebuild quickly.
 Czech
Czech  Dutch
Dutch  French
  German
  Greek
Greek  Hungarian
  Italian
  Polish
  Portuguese
  Portuguese (Brazil)
  Romanian
  Russian
  Slovak
  Spanish
  Turkish